
How to polish car headlights goes under the category of easier car DIY tasks.
One more job you can certainly do on your own which will both improve safety (through better light beams) and give a good, fresh look to your car.
With this method you can get pretty good results and save some money.
Helped me solve my problem, hope it does the same for you.
If you’re not in the mood for reading, you can watch a video tutorial on our You Tube channel.
WHY DOES CAR HEADLIGHT OXIDATION APPEAR?

As you probably know, most of today’s car headlights are made out of plastic.
One more car part that has undergone the “plastification” process in the auto industry, mainly because of cheaper production (in my opinion).
Cheaper to produce yes, longevity of parts….no.
In previous times, the lenses were made out of heavy-duty glass which lasted for the life-time of the car. The only thing that could destroy it was physical damage.
No more is this plastic material fatigue obvious than with the appearance of plastic car headlight oxidation.
Since I’m not a chemist, best click here to read a great explanation on Wikipedia to understand what exactly oxidation of plastic is.
Main enemies of the car headlight plastic are weather conditions (mainly strong sunlight), road salt in winter, chips from debris on the road etc.
All of these damage a thin UV layer which protects the car headlight lens.
Once the UV layer deteriorates, oxidation starts.
To summarize, oxidation is the cause of car headlights getting foggy and dim over time. It’s a sort of thin film that forms over the lens.
WHY SHOULD YOU POLISH YOUR CAR HEADLIGHTS?
Some main reasons :
-
Safety:
Foggy and dim headlights reduce the quality of the light beam.
Imagine a man with smudged glasses and how much proper vision would be reduced.
Less light means less vision at night and that’s very dangerous.
-
Aesthetics:
What eyes are to a man, headlights are to a car (in aesthetic terms).
Foggy and dim car headlights look bad on the car and that’s a fact.
Even if you wash the car and shine it all up, those dim headlights will ruin the whole picture.
This goes double if you want to sell your car. Believe me, it will drive away potential customers or even reduce the selling price.
Having crystal clean car headlights opposed to dim ones can mean the difference between selling a nice car and a chicken coup.
3.Easy and inexpensive job to do:
If you’re going to use this method, you’ll see that it’s both inexpensive and fairly easy to do.
It’s on the same level of car DIY as fixing a slow retracting seat belt or removing and installing hubcaps.
Also, no tools are needed, everything is found around the common household.
Again, if the car headlights are not badly damaged, this procedure will be well worth your time and save you some hard-earned money.
SHOULD YOU DO THIS PROCEDURE IF THE HEADLIGHTS ARE BADLY DAMAGED?
Well, you can try, but I can’t guarantee a good result.
If the car headlight is badly damaged (high level of oxidation, scratches, damaged plastic etc), the outcome will not be that good.
In this case, best use alternative methods (sandpaper, polishing machines etc).
Using the toothpaste method on badly damaged headlights may prove to be a waste of time.
WHAT WILL YOU NEED TO POLISH CAR HEADLIGHTS?

Most of what you’ll need can be found in the household.
-
Paper towels
You’ll need at least two normal size paper rolls.
-
Household plastic sprinkler
If you don’t have one, just use an old bottle from a glass cleaner.
-
Bottle of glass cleaner
-
Toothpaste
Be sure to use one that contains baking soda. This kind of toothpaste produces more grit making it easier to take of the oxidized layer.
Don’t use the gel type toothpaste as it will reduce the final effect. You see, the toothpaste acts here as a fine abrasive so more baking soda means more effect.
-
Old toothbrush
-
Cotton cloth
Some old t-shirts will do, that’s what I used anyway.
You’ll need two pieces of cloth, one for applying the polish wax and one for rubbing in.
-
Polishing wax for cars
This is an optional. You don’t have to do it but it will significantly prolong the repair and protect the lens.
My advice, if you have the possibility, do it.
Best have everything at hand so once you start there’s no interruptions.
Also, find some shade to park the car in.
Any kind of cleaning, polishing and waxing doesn’t like harsh sunlight.
DO YOU NEED TO PROTECT THE CAR BODY WHILE POLISHING CAR HEADLIGHTS?
With the toothpaste method…no.
Toothpaste and window cleaner (which you’ll only be using) are not aggressive substances to the car paint.
Also, this job is done only by hand so there is a small chance of damaging other parts of the car.
Exception from this is when using a polishing machine. Here you have to be a bit more careful.
But even in this case, you’ll be using a soft polishing brush for the machine that shouldn’t damage the car body.
However if you decide to protect the car body anyway, some simple paper protective tape will be enough.
Just go around the car headlight once, making a paper-tape frame around the whole headlight.
HOW TO POLISH CAR HEADLIGHTS -LENSES [TOOTHPASTE METHOD]
The whole procedure is best done one headlight at a time.
In my case, I needed about half an hour for one headlight.
So once everything is prepared:
-
Wash the car headlight with window cleaner

Make sure that you remove any grease, dirt or filth that gathered on the headlight. If filth stays on the car headlight, this will interfere with the polishing procedure.
Go over the lens at least two times.
-
Dry up the headlight with paper towel

Use the paper towel to dry up the window cleaner. Make sure it’s bone dry.
-
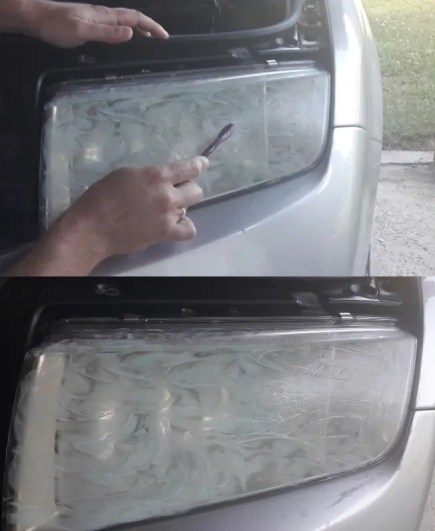
Apply the toothpaste

Use your hands for primary application.
Squeeze some toothpaste and rub it all over the car headlight. Make sure that you cover the whole lens with a layer of toothpaste.
Let it dry for about five minutes.
-
Rub in the toothpaste with the toothbrush.
Once the toothpaste dries a bit, start rubbing it in with the toothbrush.
Best move around in circles and then up and down (this doesn’t matter that much, point is to rub in the toothpaste in as much as possible).
Go over the whole headlight lens several times with the toothbrush (at least five times).
-
Use the water sprinkler and paper towel to wash the toothpaste off.

By this time the toothpaste has dried out so you;ll need some water to take it off.
Use the water sprinkler to moisturize and then use the paper towel to remove the toothpaste.
Repeat several times until the headlight is squeaky clean.
Here, it’s very important to remove all of the toothpaste. If you don’t, it will interfere with later polishing procedure with car wax.
REPEAT THE PROCEDURE FROM STEP 3 TO STEP 5 DEPENDING ON HOW MUCH THE CAR HEADLIGHT IS DAMAGED (AGAIN:APPLY TOOTHPASTE, BRUSH IN, REMOVE TOOTHPASTE, CLEAN HEADLIGHT)
ON THIS PART, YOU CAN’T OVER DO IT.
THE MORE YOU REPEAT, THE BETTER THE FINAL EFFECT IS.
In my case, I did three runs per each headlight and it did the job pretty well.
If you’re on the right track the results should drastically show after taking off the toothpaste with water.
Here you’ll get 90 percent of the final effect. If not, then this method probably isn’t the answer for your problem.
- Apply car wax

After you’ve cleaned the headlights from the toothpaste make sure the lens is completely dry.
Then use a cotton cloth, put some wax on it and rub on to the car headlight.
Go in circles and make sure you cover the whole lens.
Wait a few minutes for the wax to dry out (depending on what kind of wax you’re using).
A dry film will form on the headlight.

7. Polish car headlights with a clean cloth

After that, use the other, clean piece of cloth and start polishing. Again, go in circles around the whole headlight.
Polish until you get sufficient results and you’re satisfied with the end result. (it took me about 10 minutes per headlight).
You can repeat the polishing procedure several times. If everything is OK, once or twice will be enough.
Using a polishing machine is also an option, but not necessary. If everything is OK, polishing by hand will do the job.
Here are a few pictures of the final results when you polish the car headlights with toothpaste:


IF YOU POLISH CAR HEADLIGHTS WITH TOOTHPASTE, HOW LONG WILL IT LAST?
Best case scenario: a year. And this is if the headlight isn’t very damaged.
Worst case scenario: two or three months.
This is why I recommend other methods if the car headlight is damaged.
Although the toothpaste method is easy and inexpensive, it won’t help out much if the headlight is badly damaged. In this case, you’re only losing time and the outcome is bleak at best.
Main point here: don’t have high hopes if the car headlight is in very bad shape.
However, if you’re satisfied with the results and oxidation appears again, just repeat the procedure.
It’s not a complicated job so it’s worth the effort.
OTHER METHODS OF POLISHING CAR HEADLIGHTS
If the toothpaste method doesn’t work for you, there are other successful methods you can use.
I’m just going to mention a few of them; if you decide to use one of these methods, I’d recommend informing yourself first before trying them out.
This it to avoid loss of time and causing damage to the car.
-
Using a mix of vinegar and baking soda to polish car headlights
Essentially the same procedure as with toothpaste. Only difference is that you use a mix of baking soda and vinegar. Worth the try.
-
Using WD-40 or bug-killer sprays
To tell you the truth, I would avoid this method. They only give short-term results and even damage the lens some more. Although a very popular DIY solution, not very effective.
-
Buying a car headlight restoration kit
This is also a good option if you can spare some money. They range from 10 Euros to a couple of hundred Euros depending on the level of professionalism.
The car headlight restoration kits you’re looking for are in the range up to about 50 Euros.
Above this, it simply isn’t cost effective and you can have a professional do the job for you.
Car headlight restoration kits contain sandpaper and polishing paste (basic kits) to polishing brushes for machines of all sorts, UV finishing coat etc.(professional ones).
-
Sanding and polishing the headlights
Procedures of this kind demand more time and more equipment (like polishing machines and power tools).
Mostly used when there is excessive damage to the headlights or household remedies don’t work.
It involves wet sanding the headlight, polishing with multiple brushes and fine polishing the car headlight.
At the end a UV protection coat is added so the repair lasts longer.
This method can be done on your own provided you have the time, tools and least some knowledge of the whole procedure.
Same basic method is used by professionals.
-
Let professionals polish the car headlights
I would recommend it if the headlights are badly damaged and mainly, if you have no DIY experience.
Most car body shops do these kinds of jobs. Even a good and trustworthy mechanic will perhaps do it.
In most cases, they have all the necessary equipment and know-how to make a long-lasting repair.
The prices are not that high (at least in my country).
Prices are such that if the headlight is very damaged it’s better and more cheaper to let professionals do the job rather than buying the tools and kits needed to do the job on your own.
Especially since this is a job that when professionally done, should last for a couple of years.