
Hubcaps are one of those car parts that make a huge difference to the appearance of a car.
Having nice hubcaps instead of plain, black painted steel rims is almost a must-have.
Overtime, due to various situations, you can lose or damage a hubcap or just simply want to change the whole set.
Hopefully, this article will help you get through this task and provide some useful solutions and tips.
You can also watch a video tutorial at the end of this article or on our You Tube channel.
DO HUBCAPS HAVE A PURPOSE?
Hubcaps have these main roles :
- Protective role
Hubcaps are plastic covers that additionally protect the wheel hubs and rims.
The wheels are on the front line of all road conditions and are exposed to mud, dirt, grit, rocks, heat, freezing cold and so on.
The wheel rim (especially steels rims) offer a good protection for the wheel hub, braking discs, brake calipers etc.
Hubcaps are like an additional lid on all of these, reducing the possibility of damage.
- Aesthetic role
We all know how a common steel rim looks like.
It’s mostly painted black and you can see the wheel screws and lug nuts. Not a pretty site.
But when you put on some hubcaps, the picture totally changes and the car gets a more complete look.
Since alloy rims are in most cases pretty costly, good hubcaps are the next best thing.
Maybe the best definition I’ve heard over the years is that hubcaps are poor mans alloy wheels.


- Give your car a better car look
First of all, you as an owner will probably be more satisfied with the looks of your car.
Also, if you want to sell your car and have steel rims, putting on some nice hubcaps is obligatory.
Let’s face it, people tend to buy a car that is prettier. This is a fact of life.
Maybe your car is in top mechanical and overall condition, but this small detail will drive off a potential buyer, trust me.
If you want to sell better and sooner, reach for your wallet and buy some good hubcaps.
Can’t afford originals? Buy nice replacement ones. Better anything than nothing.
It will pay off, trust me.
For some more information on how to sell a car privately, click here.
HOW TO MEASURE HUBCAPS?
Every car wheel has its own diameter measure.
You can find out the diameter in two easy ways:
- Check the tire measure
Every wheel diameter is measured in inches.
You’ll find on the side of the tire a number with a numeration sequence like this:
185/60/14 (this is an example).

The numbers differ depending on the dimensions of the tire and wheel.
You want the last number in the sequence (in the upper example, number 14).
This means you have a fourteen inch wheel rim.
Also you’ll find 13,15,16,17 and so on. The bigger the wheel, the bigger the number in inches.
- Measurement tape
Take a measurement of the wheel rim.
Just measure the rim, not the whole wheel (with the tire).

Once you know the proper measures, everything else is easy.
Simply ask for hubcaps for a 14 inch wheel (in this example) and the seller will know what you’re talking about.
Also have in mind what kind of system is used to hold the hubcap in place.
Most common systems for holding a hubcap in place:
- Clips that clip on to the wheel lug nuts or screws
- Clips that clip in to the small holes on the rim

- Circular, wire-like ring that clips in to the outer part of the rim
- Hubcap held in place by lug nuts or wheel screws. You have to loosen the wheel in order to remove the hubcap.
Just make sure to buy a proper match.
If this is too complicated for you, just take off one hubcap and bring it with you to the shop where you’re going to buy.
No mistake there for sure.
WHAT TOOLS WILL YOU NEED FOR REMOVING THEM?
- Your own hands: best “tool” if the situation allows it.
Removing hubcaps is best done by hand. This way you’ll avoid making any kind of damage.
Possible if the hubcaps have openings on them which allow a firm grip.

- Flathead screwdriver: use if the hubcaps don’t have any openings on them.
If the surface of the hubcap is leashed of any kind of opening the only way you can take it off is by opening a slit between the rim and hubcap.
Since the screwdriver is a common household item, most of us use it for this job.

The tricky part is that you have to be careful as metal against plastic usually ends in the defeat of plastic.
My advice, find the biggest flat head screwdriver you have around the house. Better leverage and less chance of breaking the hubcap.
Use it as a helper rather than a main tool.
- Zip ties
These are used to additionally tighten the hubcap.

Perhaps primitive but highly effective solution.
Find ones that match the color of the hubcap so it doesn’t look ugly.
More on this topic lower in the article.
- Pliers or a scalpel
These have the function of cutting of the zip ties.
Pliers for cutting (when removing) and tightening (when returning).
Scalpel is just for cutting of the zip ties.


Just be careful when using not to damage the hubcap.
- Specialized tools for removing hubcaps
You have specialized tools for this job ( a crowbar like tool, specially bent for this purpose and reduces the possibility of damage).
Of course best for this job as it is made specifically for this task.

But given the number of times you’ll need it and the money you have to spend, I wouldn’t advise it.
You should be able to manage without it.
- Plastic trim tools
If you have a set of plastic tools for taking off trim panels, that would be great.
The plastic tips on these tools are perfect for separating the hubcap without causing damage.
Like with the specialized tools, I think you can manage without them.
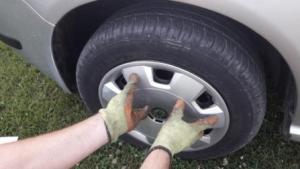
HOW TO REMOVE HUBCAPS?
Main task on this part is to get them off without making damage (breaking the plastic or damaging the clips).
This goes double if the hubcaps haven’t been removed for a long time.
In any case, take your time and don’t use excessive force as you’ll only cause damage.
Here’s the procedure:
- If the hubcaps are tightened by zip ties, first remove them (use pliers or scalpel).
- Find a place on the hubcap where you can assume a firm grip. You’ll maybe need to give it a strong pull, find a place where the hubcap plastic is stronger so you don’t break off anything.
- Do this with two hands. My advice, go for the 12 and 2 o’clock hand position.

- Pull the hubcap off. If it doesn’t come off in one budge, go around the wheel and give it a few additional pulls.

If the hubcap has a closed design (the surface doesn’t have good place for a firm hand grip), use the screwdriver.
Also,if you have a firm grip, but the hubcap won’t budge, use the screwdriver.
Be careful so you don’t break or damage the hubcap (plastic or paint).
Just use it to make an opening between the hubcap and wheel rim. Preferably place it directly where the holding clip is located.

This way it will pop out easier.
Then use it as a lever to push the hubcap off the wheel rim.
Once you’ve made an opening, the rest is best done by hand.
As mentioned, use the screwdriver as a helper not as a main tool.
HOW TO INSTALL HUBCAPS?
Before starting, prepare some gloves to protect your hands.
Procedure goes like this:
- Position the hubcap so the holding clips are turned to the wheel rim.

2.Align the holding clips with the holes on the rim. Be careful that every clip “sits” in place or else they can get broken (this applies to whatever the fitting system maybe).

3.You’ll just be using your hands, no tools needed.

4.Once you’re sure that every clip will sit in place properly, start pushing the hubcap in place.
5.Start from the top and go clockwise. This isn’t a necessary rule. You can go counterclockwise; just do the pushing in an orderly manner as this will guarantee that the hubcap will sit in place properly.
6.Freely use your fist and slightly hammer the hubcap in place. This is done if any clip needs some additional force to fit in.
Again, before final “hammering” in to place, be sure that every clip sits in properly. I’ve seen many people struggling to put on the hubcap not aligning the clips properly.
Then they bang on the hubcap trying to force it on to the wheel rim.
This only leads to causing damage.
Also avoid using any kind of excessive force (hammers, very strong hitting or else).
If you can’t do it by hand, with moderate strength, then you’re doing something wrong, trust me.
HOW TO TIGHTEN HUBCAPS?
Many drivers have come across these troubles.
You see, over time the clips and clip holders that hold the hubcaps in place weaken.
Mostly due to material fatigue or frequent removals.
Combined with potholes, curbs and other possible road mishaps, a missing hubcap is only a matter of time.
To avoid this ordeal in the first place, simply use zip ties to additionally tighten the hubcap.
- Simply, after installing the hubcap, take the zip tie, push it through the hubcap and through a hole in the wheel rim.
Best put two zip-ties for extra insurance.
Position the zip-ties on the wheel opposite from another (about 180 degrees if possible).

- Connect the ends of the zip tie and tighten.

- Tighten up as much as you can by hand, additionally with pliers. Don’t overdo it so you don’t damage the hubcap.
- Cut of the “tails” of the zip ties when finished with a scalpel or pliers. Cut them off at the zip tie “buckle”.
Turn the buckles towards the inner part of the rim so that they’re less visible.
Better for aesthetics.
Also find a color of plastic straps that doesn’t differ much from the color of the hubcap.
Some will say that zip ties are not a pretty solution (in way of aesthetics) and to some point I agree.
It does perhaps harm the overall look. But you’ll get used to it.
Just think about lost money and time finding a new one. Not to mention driving a car without one hubcap.
Then it won’t bother you that much, trust me.
WHAT KIND OF HUBCAPS SHOULD YOU BUY?
From what I’ve seen on the market there are basically two kinds:
- Originals
Ones that you buy with the car. These are by far the best.
Let’s face it: car manufacturers tend to make their own hubcaps to improve the looks of their cars.
Unlike others, who imitate alloy rims, originals are, in most cases molded to follow the overall looks of the car.
Also they are made in better in quality. The plastic material is better, less prone to breaking and more resistant to road conditions.
The clips that attach the hubcap to the rim are also made much better.

Downside is the price. If you lose an original hubcap, they are pretty expensive to replace.
The ratio is something like 1 original for 4 copy hubcaps.
Also, they can almost only be found in licensed dealerships.
In most cases you’ll have to wait for the dealership to order them, especially if you’re driving an older car model.
Next best thing to do:try to find used originals.
Takes a bit more searching but should be a good replacement and cost less.
They will probably have a few scratches here and there, but for the lower price it’s worth overlooking.
2.Copies of originals, low-budget replacements
Once you enter the realm of cheap and copy hubcaps you’ll have a huge variety from which to choose and the prices are very affordable.
But the price is where the good part ends.
Designs mostly border on ugly and the quality is poor.
Bad looks, crooked fit, easy damaging and falling off the wheel are just some of the reasons why you should think twice.
Not to mention bad graphics of the manufacturer logo, if there is one in the first place.
Perhaps best bought if you want to sell the car or if the hubcaps are just not that important to you.
HOW TO CLEAN HUBCAPS?
Cleaning hubcaps is best done when you wash the car.
(How to properly wash a car by hand, you can read in a separate article here).
Use the same car shampoo and sponge used to wash the rest of the car and give them a good scrub.

If there is grease or some hard-core filth, use special cleaners for this purpose.

You can use some home remedies but I would strongly advise against it as it can damage the paint and plastic of the hubcap.
You can buy these cleaners anywhere (car part shops, shopping malls, gas stations etc).
Just like with alloy wheels, spray the cleaner on the hubcap, leave it for a little while and then rinse off.
Same procedure for the inner side, although this is rarely done by any driver.
HOW TO REPAIR DAMAGED HUBCAPS?
Over time, hubcaps get scratched, chipped or simply broken.
- Broken hubcaps
When they break, any kind of mending is not very possible.
Plastics that are used to make hubcaps are simply not prone to mending.
Any attempt of plastic welding, sticking together with glue or else will be short-lived. Best buy a new one on this part.
- Chips and scratches
This kind of damage can be successfully repaired.
If the damage is minor, simply find some same-color paint and a small painting brush.
Go only over the scratches (don’t make a mess around) and this should do the job.

However, if the damage is worse the procedure involves sanding off the old paint from the hubcap, spraying with plastic primer and then painting.
Of course, this is the very basic procedure.
Professionals know that there is more fine tuning on this part to get the best results.
If you have any experience with paint-jobs you can make an attempt to do this repair.
If not, best let a professional do the job.
It will cost some money, but the results will be close to perfect (matching the exact color, finishing touches etc).
This goes double if you have a rare or old type of hubcaps that are hard to find or replace.
Video tutorial:
