
One more great car skill worth learning is how to replace a car battery.
Why is it good to know this? Well for one, you can help yourself if the battery runs flat at an inconvenient time or place (like on the road, parking lot, or else). Second, you can save some money by not having to tow your car or visit a mechanic.
Although a lot of drivers think of this as a complicated task (perhaps since electricity is involved) but this article will show that it isn’t. It will guide you through the whole procedure and hopefully provide a successful outcome.
Before we start with the actual procedure, we’ll also answer some of the most asked questions related to this topic.
If you’re not in the mood for reading, you have a video tutorial at the end of the article. You can also watch the video on our YouTube channel.
WHEN SHOULD YOU REPLACE THE CAR BATTERY?
This question is pretty obvious: when it’s flat or as most drivers say „dead“.
So when you turn the ignition key and there’s no cranking or the cranking is weak, the dashboard lights are dim or don’t appear at all, the battery is the first thing to check.
Also, be prepared for a replacement if the car battery is five or more years old. This is, at least, from my experience, the period when problems start.
The problems are mostly recognized as a brief weak cranking in the summer which progresses to no cranking at all in the winter when the temperature goes down.
In this case, see that you replace the battery as soon as possible and don’t wait for trouble in the winter season.
Before the replacement, make sure the battery is the actual problem. Some other things regarding the battery may cause similar symptoms :
- dirty or corroded battery terminals
- loose battery clamps
- loose ground connections (for more information on this topic click here)
- low alternator voltage output (for more information on alternator problems click here)
If you want to read about other common questions and answers regarding car batteries with some advice, click here.
WHAT TOOLS WILL YOU NEED?
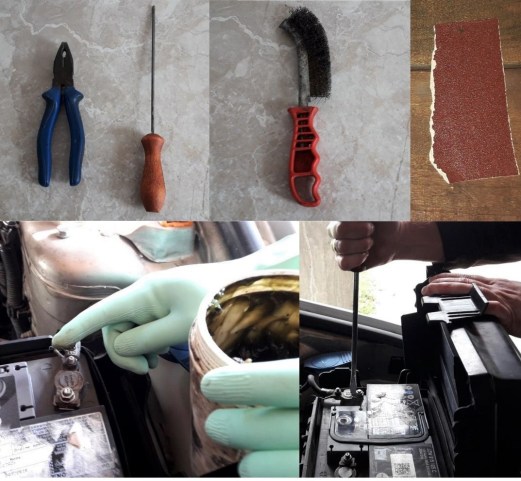
This procedure is not needy in terms of tools. Most of this you already have around the household:
- wrench or a small ratchet with a matching socket. The most common are 8, 10, and 13 millimeters
- a wrench or a bigger ratchet with a longer extension. This is for the bracket that holds the battery in place. A 10 mm or 13 mm screw or nut usually holds it.
- protective gloves. Rubber ones or a pair of thinner working gloves will do fine.

Optional:
- A pair of combined pliers and a bigger screwdriver. This is used when battery clamps are hard to remove.
- Some sandpaper, a file, wire brush, or even better a battery terminal/clamp cleaning tool. If the battery terminals are already clean, you don’t have to use any of this.
- Lithium grease or spray for protecting the battery clamps from corrosion. You can finish the job without this but it’s great for future protection.
- Zip ties for holding and fastening the clamps. If the clamps can be safely tucked to the side of the battery when removed, you don’t have to use zip ties.
HOW TO REPLACE A CAR BATTERY?
Make sure before you start that you’ve bought the proper battery (more on this lower in the article).
1. Once you’ve parked the car, lower the driver’s window, take out the ignition key and pull the handbrake. Put the car in neutral (for stick shifts) and P for automatics. Instead of lowering the window, you can leave the driver’s door open. The point is to have access to the passenger cabin when the battery is disconnected.

2. Make sure that any appliance that works without the ignition is turned off (for instance the radio, position lights, or else.

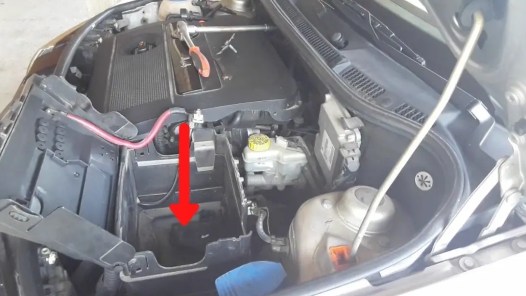
3. Open the hood and find the battery casing. It usually looks like a plastic black box with a lid on it. You will probably find „+“ and „-„ signs on it or a battery icon. Some engine bays are crammed and covered with plastic so finding and recognizing it may take longer. Have in mind that some cars have a car battery in the trunk. If you get confused, find the location in the car manual or on Google or YouTube.
On most cars, they’re visible immediately when you raise the hood so there’s no question about it.

4. Open the battery casing, it will be held with hinges or can be totally removed. If held with hinges use some zip ties to hold it back so it doesn’t interfere.

5. Take off the minus battery clamp-use the wrench or ratchet with a socket. This exact order is very important as you’ll avoid causing an accidental massive short circuit. When taking the plus off first, you’re at risk of touching a metal surface around the battery and causing a short circuit. This warning goes double if you’re using a simple wrench.


6. Take off the plus clamp

7. Tuck both of the clamps aside so they don’t interfere when taking out the battery. Use zip ties if you have to.

8. Release the bracket holding the battery using the bigger ratchet and extension. The most common location of this bracket is at the bottom of the battery casing. A 13 mm screw or nut usually holds it. On some cars, you can use a wrench but on most the bracket is in a tight spot and only accessible with the extension.
Another common bracket type is the one with nuts or screws located on top of the battery, one with the bolts located on each side.

9. Take out the battery. Most car batteries have convenient retractable handles so you can use them to pull it out. If that’s not the case, try and put your hands around the battery. Whatever the case, make sure you have a good grip so it doesn’t fall either on the car or yourself when taking it out.

10. Inspect the tray under the car battery. If there are rubbish and filth, best clean it before inserting the new battery.
11. Check that the battery clamps are clean and corrosion-free, especially the inner parts. If they’re not you should clean them to avoid bad contact. For more information on how to clean the battery terminals and various ways to do it click here.

12. Insert the new battery. Lower it slowly into place and make sure it sits firmly on the battery tray.

13. Return the bracket into place. Make sure it sits in properly. Tighten to about one-fourth of a full circle once the screw or nut reaches the end. Don’t overtighten so you don’t damage the battery.
With the other bracket type, tighten the nuts so much that the bracket has a firm grip on the battery.
14. Put the plus terminal back and tighten the clamp. Remember, when returning the clamps, the procedure is the opposite. Plus first, minus second. Both clamps should be tightened with one-fourth of a full circle once the nut or screw reaches the end.

15. Now put the minus terminal back. You may experience a small spark when returning it. This is normal as the car installation is powering up. Tighten it.
If there’s a strong spark, something was probably left on before disconnecting the battery.

16. Try starting the car. If everything is OK, it should start with a strong crank. After that turn off the car.

17. It would be good to protect the battery clamps and terminals using lithium grease or spray. This will protect them from future corrosion.

18. Return the battery casing lid into place, make sure it sits in properly.

19. Check that all the tools are removed from the engine bay.

20. Close the hood.

ADDITIONAL TIPS
-
AVOID REPLACING THE BATTERY ON HIGH-TECH CARS
I hope you know what I mean: newer and premium cars, cutting-edge models, or ones that may have various additional systems.
These are packed with electronics that are sometimes very sensitive to a complete loss of power.
If you try the replacement on your own, you may encounter serious problems like doors locking or not being able to start the car at all. Although the procedure to replace the battery is simple, reviving the car may not be.
Simply, some modern cars are made like this and any DIY work is not recommended or not possible at all. After installing the battery, additional work may be necessary (like connecting to the car’s ECU or else).
Please take this advice seriously if your car is a modern electronic rocket ship. You may start something that you won’t be able to finish and end up paying a hefty sum to a licensed dealership to fix the problem.
When there’s a probability of a scenario like this one, best do some research before starting: look in the car manual, Google it, use YouTube, or else.
-
BE CAREFULL WHEN TAKING OUT THE BATTERY
When removing the battery from the engine bay, best do it in one try. This means not leaning the battery around the engine bay, fender, or else.
Taking the battery out may prove to be somewhat of a task since even the smallest battery is pretty heavy.
Because of this, you may accidentally hit or damage other parts in the engine bay or damage the paint job on the fender, for instance.
The best way to avoid this is to give the battery a bit of a budge before you try and take it out. If you conclude that it’s too heavy, best ask for help. Better this than damaging the car.
-
DON’T OVERTIGHTEN THE BATTERY CLAMPS
If you overtighten the battery clamps, you’re at risk of damaging either the nut (screw) or the clamp itself.
Besides that (and more important), in case of any kind of emergency, you’ll have a very difficult time taking them off. I’ve seen these kinds of situations, having a stuck battery clamp means the difference between minor damage and a disaster.
Also, it’s a pity to damage the original clamps from the manufacturer as they are the best fit. They can be replaced with aftermarket ones, but it’s just not the same thing.
So, when the nut reaches the end, one-fourth of a full circle is enough. Wiggle the clamp, if it’s tight that’s it.
-
IF YOU CAN, USE A RATCHET WITH A RUBBER END
One of the worst things you can do is accidentally cross-connect the battery poles with a wrench. Although it seems improbable, it does happen, especially to more inexperienced drivers.
The result is a huge spark usually followed by a large bang sound; the wrench heats up instantaneously which can cause serious hand burns. Very serious and outright traumatic experience.
To avoid this, I always recommend using a small ratchet with a rubber end. Even if you lose attention and cross-connect the terminals, nothing will happen.
The second way is to use a shorter wrench that can’t reach both terminals no matter how the screws or nuts are positioned.
-
BUY THE PROPER BATTERY
Things to pay attention to:
- Voltage (12 volts for cars, 24 volts for some pickups and trucks).
- Amp-hours (45 Ah, 55 Ah, 100 Ah, and else)-this represents how strong the battery is.
- Size-make sure the battery can fit into the tray and casing.
-
MAKE SURE THE POSITION OF THE BATTERY TERMINALS ARE CORRECT
Make sure that you don’t buy a battery with switched terminals (plus is where the minus is supposed to be and vice-versa).
In this case, the clamps won’t reach the terminals rendering the battery useless. By the way, this is the most common mistake people make when buying a new battery on their own.
So, if you’re buying a battery by yourself and want to learn how to replace a car battery, know that all of the main data is located usually on a sticker on top of the battery (voltage and amp-hours). Regarding the battery terminal positions best take a picture or bring the old battery and compare it with the new one.
When buying at a car parts shop, the salesman will probably already know what’s the proper battery is for your car.
-
BUY A QUALITY CAR BATTERY
There are dozens if not hundreds of car battery manufacturers out there. When it comes to choosing it can be a pretty tough task.
Less known manufacturers lure you with lower prices while brand names appeal with their decade’s long experience in making batteries.
I’ve tried it all, the low end, medium, and high end. All that I can say: give more money in the beginning and buy from a quality and renowned manufacturer.
Otherwise, you may save money now only to give it all back very soon. For instance, a recently replaced low-quality battery that will suddenly let you down will eat up the savings with one towing when you can’t start the car.
If you can’t buy this, then at least go for the medium range that has a decent guarantee. Good enough solution, especially for older cars that aren’t worth investing lots of money in.
-
CHECK THE VOLTAGE OUTPUT
This is a very good thing to do once the replacement is over if you have a multimeter.
Why is this good? Well, it’s the final confirmation that everything is OK, both with your replacement and the alternator. When the multimeter shows around 14.5 volts you’re good to go.
Besides this, it may warn you if the battery wasn’t the problem in the first place. I say this as a lot of people change the battery head over heels only to encounter the same problem once the new battery is depleted again.
If the battery voltage is low (12.5 to 13 volts), then there’s a problem elsewhere and you should tend to it as soon as possible so the new battery doesn’t get damaged.
If you don’t know how to do check the alternator voltage output, click here for an article on that topic.
-
HOW LONG DOES IT TAKE TO REPLACE A CAR BATTERY?
If you have prior knowledge of how to replace a car battery, a tool kit at hand, and supposing the battery is in an easy-to-access place, ten to fifteen minutes at most.
With less experience around cars and tools but with some guidance, it will take about half an hour to an hour.
This applies if the procedure goes normally.
If there’s any additional work (like cleaning the battery clamps, battery tray, if there’s any damage, or else) it may take somewhat longer.
CONCLUSION
There were times when knowing how to replace a car battery was common and required knowledge for drivers. Right alongside changing a flat tire or light bulb, for instance.
Today, the fact that cars are slowly becoming computers/robots on wheels and that lots of people are estranged from DIY work seems to paint a different picture. Touching anything under the hood seems like touching a precious vase.
But the fact is that, despite all of this, the majority of today’s cars that are driven or will be driven in the near future have the possibility of a DIY battery replacement.
Having this in mind, it would be a real pity to be left stranded on the road or in front of your house because of a task that’s easy to learn, pretty safe to do (if you’re at least a little bit careful), and won’t take up much of your time.
This goes double for older cars and ones that are not super-packed with electronics and all kinds of software. Here, it’s outright an obligation.
So, if your car will not crank and the lights go dim, knowing how to replace a car battery will enable you to solve the situation with a smile on your face instead of having a nervous breakdown.

Written by: Sibin Spasojevic
Former car technician, life-long car and DIY enthusiast, author for Despairrepair.com
HOW TO INSTALL A CAR BATTERY YOUTUBE VIDEO TUTORIAL