
Tail light bulb replacement is one more simple procedure that you can certainly do on your own.
If a brake light, turn signal, position light or else is not working (regarding car bulbs), then this article should be able to solve your problem.
This tutorial does not apply on tail lights that have complete LED technology. These tail lights are mostly sealed up and meant to be replaced as a whole. Some can be fixed, but that’s another story.
Besides the actual replacement procedure, you can find some more information on this topic like how to gain access to the tail light bulb assembly, how to replace the proper car bulb, what bulbs are used for the tail lights and more.
However, if you don’t feel like reading, you have a video tutorial at the end of this article or you can watch it on our You Tube channel.
MAIN REASONS WHY YOU SHOULD LEARN TO REPLACE A TAIL LIGHT BULB

-
Safety : neglecting a burned out bulb means less visibility on the road which can lead to an accident
-
You’ll be able to make the replacement at a moment’s notice (for instance, if you notice the problem while on the road, you can fix it immediately)
-
You’ll avoid paying fines and tickets.
-
It’s very simple to do
WHAT WILL YOU NEED TO MAKE A REPLACEMENT?

In most cases, just spare bulbs and your own two hands.
In more complicated situations, you may have to take off the whole tail lamp in order to access the bulb assembly.
But don’t worry if this is the case. You’ll only need a screwdriver or a small diameter wrench or socket (like 8 mm or 10 mm). These systems are present on some cars because of the car body construction and lack of access to the bulb assembly from the trunk compartment.
HOW TO GAIN ACCESS TO THE TAIL LIGHT BULB ASSEMBLY?

Believe it or not, but finding the access hatch together with taking out the bulb assembly causes the most problems for drivers regarding this replacement (from what I’ve seen at least).
The tail light bulb assembly is the rear, detachable part of the tail lamp that both holds the car bulbs in place and provides electricity for them.
Shorter said: it’s the part that’s most important to you in order to replace the tail light bulb.
It’s usually made out of plastic, has electric connection lines stamped in and a wiring harness connected to it.
In older cars, the bulb assembly wasn’t covered by anything and was immediately accessible. On most modern cars it’s hidden, mostly for aesthetic reasons.
No need to worry though as access locations on most cars are standardized so all you need to do is take a careful look near the tail lamp.
On most cars there are two main ways of gaining access to the bulb assembly:
-
Through the trunk compartment and opening access lids (most common)
Once you open the trunk, you’ll find access lids near the tail lamp. They are usually made of the same material as the upholstery in the trunk and are held in place by some sort of latches or by slits in the upholstery.
When you find the access hatch, just un-latch the lid or pull it out.
-
By taking off the whole tail lamp
If this is your case, then you have to take off the whole lamp. Although it may sound hard to do, in most cases it only involves taking off a few screws or nuts. The tail lamp is pulled outwards and the tail light bulb assembly can then be accessed.
Some other locations that are worth mention:
-
C pillar (if the car has “high“ tail lamps in the C pillar)
-
Trunk door (if the tail lamp is divided between the car body and trunk door)
In both of these cases the principle is the same, only the access points are in different places.
Some cars may have “stubborn” access hatches (because of bad latch solutions, flimsy material or else) which can lead to damage if excessive force is used.
If this is the case, I would advise to either Google the topic for your car or make a good assessment so you don’t damage or break off anything.
HOW TO TAKE THE TAIL LIGHT BULB ASSEMBLY OUT?

Tail light bulb assemblies are usually held in place with:
-
Plastic clips (one or more)
-
Screws with plastic handles or nuts
-
Some lamps may have separate bulb holders-not a one piece assembly, rather each bulb has a holder of its own(screwed on the lamp separately).
Before taking off the bulb assembly, best take a look what’s the system on your car in order to take it off more easily and avoid damage.
The basic principle is:
-
Take hold of the tail light bulb assembly
-
Un-clip or un-screw (depending on the assembly system)
-
Pull the whole bulb assembly out.
Exception from this is if you have to take the whole tail lamp out. In that case, first take off the lamp and then use the mentioned three steps.
Just like with the access lids, avoid using excessive force; parts can easily break off, especially plastic clips.
HOW TO REPLACE A TAIL LIGHT BULB? (COMPLETE PROCEDURE)
-
OPEN THE TRUNK

-
OPEN THE ACCESS HATCH (OR REMOVE THE TAIL LIGHT LAMP IF NEEDED)


-
TAKE OUT THE BULB ASSEMBLY


-
DISCONNECT THE WIRING HARNESS ONLY IF YOU NEED TO. OTHERWISE LEAVE IT ON THE ASSEMBLY.

-
FIND THE FAULTY CAR BULB

It should be easy to recognize: the car bulb will either be misty, clouded, dark-colored or the filament will be burned out/damaged.
-
TAKE OUT THE FAULTY TAIL LIGHT BULB

The car bulb is inserted in a socket. If it’s a standard socket, then just mildly press the bulb down and turn counter-clockwise. It should come out without any problems (unless it’s rusty and hasn’t been changed for a long time).
Sometimes you don’t have to twist the car bulb, rather just pull it out. See what works best for you.
-
CLEAN THE CONTACT OF THE BULB SOCKET

Take a look at the contact of the bulb socket. If it’s nice and clean then skip this tip.
If it’s rusty or has deposits on it, use a small flat head screw driver or some sandpaper and scrape of the filth; after that apply some contact spray or WD-40.
Do the same for the base of the car bulb (lead contact at the bottom). Mildly scrape it with the screwdriver tip or with sandpaper.
-
INSERT A NEW TAIL LIGHT BULB

Take a look at the metal base of the car bulb. You’ll see two small bulges on the base; they hold the bulb in place (more details and a picture lower in the article).
Make sure you turn them correctly so they fit in to the bulb socket. I’m saying this as a lot of people force the car bulb in to the socket and then get it stuck.
Rather see that it first fits loosely in to the socket; after that give a little push downwards and turn clock-wise. The bulb will raise a bit (the contact will push it back), that’s a sure sign that you’ve done everything OK.
At this point you can check if the car bulb works or later, when you’ve finished the whole job.
Make sure to insert the same car bulb in terms of size, voltage, watts and base fitting (the base bulges can be sometimes be in a different position). More details on this lower in the article.
-
RETURN THE TAIL LIGHT ASSEMBLY IN TO PLACE (IF YOU HAD TO TAKE THE WHOLE TAIL LAMP OFF, FIRST RETURN BULB ASSEMBLY AND THE TAIL LAMP IN TO PLACE)

Make sure that the tail light bulb assembly fits in to place and that all of the car bulbs are positioned properly.
Almost all tail lamps have strictly predefined positions for the assembly so there shouldn’t be a problem.
After that, push the assembly in to place until it clicks. If it has screws or nuts instead, then tighten them in to place.
If you had to take off the whole tail lamp, first return the bulb assembly and then mount the lamp. See that everything fits properly, especially pay attention to the rubber seal and the wiring harness (to prevent leaks or wire damage).
-
CHECK THAT IT WORKS

At the end, make a check that the new car bulb actually works. Best check all of the tail lights, just in case you’ve accidentally disrupted something else.
A little useful tip at the end of this procedure: if you happen to be alone and you can’t see the tail lamps, try using a mirror.
-
RETURN THE ACCESS LID IN TO PLACE


CAR BULBS THAT ARE USED IN THE TAIL LAMP
TYPE |
WATTS |
Position light |
5 watts or 21/5 watts (dual filament bulb, combined position and brake light)
|
Turn signal |
21 watts (yellow colored glass in most cases)
|
Brake light |
21 watts or 21/5 watts (dual filament bulb, combined position and brake light)
|
Reverse light |
21 watts
|
Fog light (optional): |
21 watts
|


HOW TO KNOW WHICH IS THE CORRECT REPLACEMENT BULB?
Although this is a fairly simple job, I’ve seen a lot of people replace the old, burned out bulb with a wrong one.
Most common mistakes that I’ve seen:
-
Replacing a car bulb that’s the wrong size (yes, this does happen); although for instance a 21 watt bulb is significantly bigger then a 5 watt one, people will make this mistake.
-
Inserting a car bulb with dual filaments when the old bulb had just one.
-
Replacing a car bulb with the wrong voltage-12 volts instead of 24 volts or the other way around.
These mistakes, in most cases, can’t cause any damage but they will make the tail lights work incorrectly.
To avoid these mistakes pay attention to this:
-
Size or color of the car bulb

Dual filament (21/5 watts) and 21 watt bulbs are bigger then the 5 watt ones (regarding the glass balloon size).
In terms of color, all of the bulbs are transparent except for the turn signal bulb. It will have a yellow color (except if the tail light lamp is already colored in yellow, then the bulb will also be transparent).
-
Voltage

Most car bulbs come in either 12 volts or 24 volts. 6 volts are mostly used on motorcycles.
Cars use mostly 12 volts, while some pick-up trucks and trucks mostly use 24 volts.
Most important here is not to mix them up. Putting a 24 volt car bulb instead of a 12 volt will make the light dim and weak. Other way around and the bulb will burn out.
-
Power (watts)
The most common are 21 watts, 5 watts and 21/5 watts (dual filament bulbs).
This parameter dictates the power of the light, so to say. So, if you mix them up only harm will be either too strong or too weak light.
-
Base of the car bulb
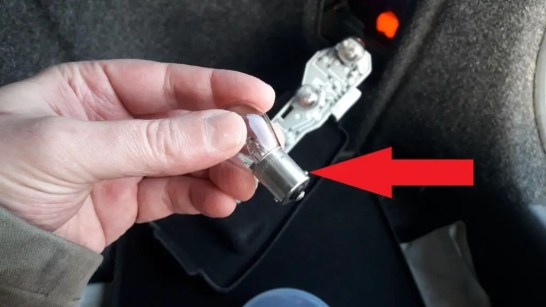
As mentioned the base has small bulges on it that fit in to the bulb socket.
The position of the bulges can be different, so take a look that it’s an exact match.
Otherwise you won’t be able to get the bulb in to the socket or worse, you’ll get it stuck.
-
Dual or single filament

Bulb manufacturers have a practical solution for combining two lights (like the brake and position light).
Instead of one filament (the thread inside the bulb), they put two. This way, in one socket you get two lights.
They are best recognized by the dual threads inside the bulb as well as the two separate base contacts.
Inserting the wrong car bulb can mean that the tail lamp won’t work at all, both of the filaments can work at the same time or just one filament will work.
Best look at the old bulb. Pay attention to the number of filaments and base contacts and you probably won’t make a mistake. Also, look at the contacts in the bulb socket, for dual filament bulbs there will be two, for single only one.
HOW MUCH DOES IT COST TO CHANGE A TAIL LIGHT BULB?

Two costs you should consider: one is the car bulb, the other is labor (if you choose to let someone else do the replacement).
Tail light bulbs usually cost between 1-5 Euros a piece, all depending on the size, power and most of all, quality.
Labor is charged about 5 Euros (from my own experience) since this is a very easy job to do.
Most garages or car part shops will do the replacement for free if you buy the bulbs from them. At least that’s the case in my country.
WHERE CAN YOU GET A TAIL LIGHT BULB REPLACED?
If you’re not able to make the tail light bulb replacement yourself then you can look for help at these places:
-
Local mechanic
-
Authorized dealership
-
Car parts shop
-
Gas station
-
MOT or Vehicle Inspection
Since replacing a tail light bulb is a pretty easy job all of these people should gladly help you either for a small fee or even for free.
MAKE A TAIL LIGHT CHECK UP FROM TIME TO TIME

Half the job of fixing a tail light bulb problem is noticing it on time.
Drivers, most of the time, don’t even notice that a tail light bulb is burned out which leads to driving like this for weeks or even months which is dangerous.
To prevent this, I urge you to make an occasional tail light inspection (perhaps once a month), even if you have a dash-board warning light for a faulty car bulb.
If you can, make this a part of the basic check ups on your car (if you want to learn how to make basic check ups click here for a separate page on that topic or watch a video on our You Tube channel).
VIDEO TUTORIAL